
How to build a 3D Renderer with 2D HTML Canvas
Published at Dec 17, 2018
These last few months I’ve taken a deeper interest in math, physics, and art. I wanted to make a fun and interesting project. So I took inspiration from something I learned in art class along time ago - Vanishing Points. I built a 3D cube representation in HTML canvas using plain javascript. This tutorial below will show you how to create one as well.
Prerequisites
- Basic knowledge of HTML,CSS, and Javascript
- High School Geometry
- Vanishing Points
Goals
The goal is to learn how to create a 3D representation of a cube on a 2D HTML canvas, using a single vanishing point. This guide is a multistep blog post series, the first demo will show a much simpler example
Planning
Breaking things into small tasks will make things easier to understand.
- Initialize Canvas
- Initialize points in space
- Draw two lines pointing away from the cube
- Add a cube front-face
- Add event listeners for toggling variables
There’s many other ways of building this cube, but this is how we’re going to do it here. Building a vanishing point cube could be done in many other ways with pure CSS, SVGs, or even a webGL library like three.js
Setup
First create the basic setup. This is the index.html file starting point with a canvas element to modify
<!DOCTYPE html>
<html>

<head>
  <link rel="stylesheet" href="style.css" />
</head>

<body>
  <canvas></canvas>
  <script src="script.js"></script>
</body>

</html>
In the same folder add some basic styles in style.css. This positions any sliders or overlays to be above the canvas when written in HTML
body {
  background-color: lightgray;
  display: flex;
  justify-content: center;
  align-items: center;
}
.slideContainer {
  position: fixed;
  right: 30px;
  top: 30px;
  background-color: lightblue;
  z-index: 20;
}
canvas {
  border: 1px dotted red;
  padding: 80px;
  background-color: lightgray;
  transform: scale(0.5);
}
Initialize Canvas
The first thing we want to do is create a single point in space. To do this, you need to select the canvas object using a query selector. Since canvas elements work by pixel values, we’ll change values on those units. We’re going to use a coordinate grid system of 1600 wide x 800 high.
Note that X grows in size going right, y gets larger growing downward. (0,0) starts off at the topleft of screen
var canvas = document.querySelector("canvas");

canvas.width = window.innerWidth;
canvas.height = window.innerHeight;

canvas.width = 1600;
canvas.height = 800;

var ctx = canvas.getContext("2d");
Initialize points in space
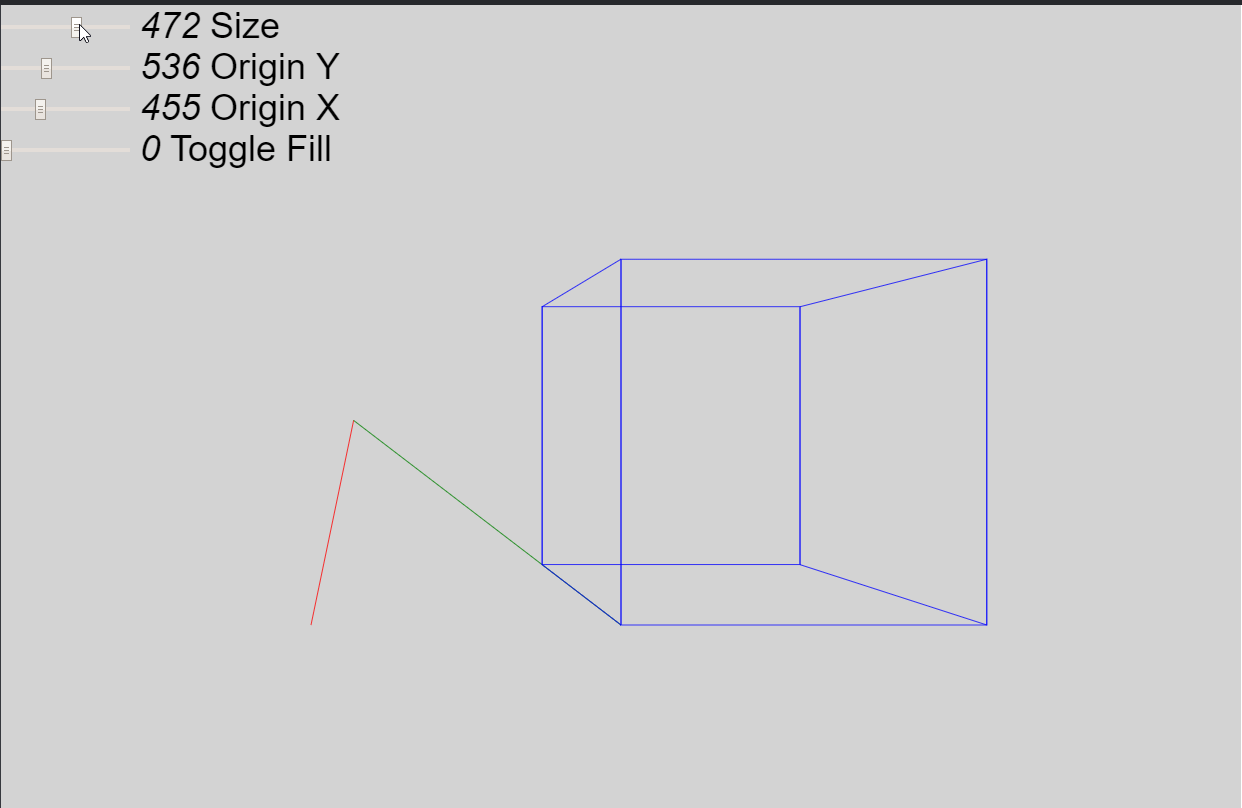
We’ll drawn an origin point. For this example, we need 3 points. The origin point, and two points in space to build a vanishing point line. We’ll also need to define an initial size for the cube. Cubes are all the same length on every side, I defined it with a variable called delta
// Vanishing point 0
var x0 = 400;
var y0 = 400;

// Vanishing point end 0a
var x0a = 0;
var y0a = 800;

// Vanishing point end 0b
var x0b = 800;
var y0b = 800;

// Length of box's side
var delta = 700;
Draw two lines pointing away from the cube
Since we have 3 points in space, we can start drawing lines. We use the canvas objects method called beginPath() to tell it to draw a line. After that, we specify a starting point, an endpoint, and a stroke style / value.
// First Line
ctx.beginPath();
ctx.moveTo(x0, y0);
ctx.lineTo(x0a, y0a);
ctx.strokeStyle = 'red';
ctx.stroke();

// Second Line
ctx.beginPath();
ctx.moveTo(x0, y0);
ctx.lineTo(x0b, x0b);
ctx.strokeStyle = 'green';
ctx.stroke();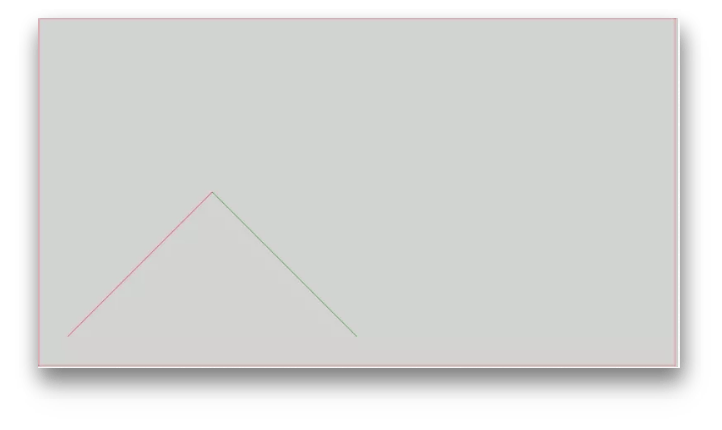
At this point, you should have a simple canvas element with 2 lines on it. Check out the javascript file code below to see where we are at.
Draw a Front Face
The frontface of a cube is a square, where all sides are equal. We’ll use the end of the right line as one of the four points of the square.
// Box based on second Line
ctx.beginPath();
ctx.moveTo(x0b, y0b); // starting point
ctx.lineTo(x0b + delta, y0b); // right x+100
ctx.lineTo(x0b + delta, y0b - delta); // up y-100
ctx.lineTo(x0b, y0b - delta); // left x-100
ctx.lineTo(x0b, y0b); // down y+100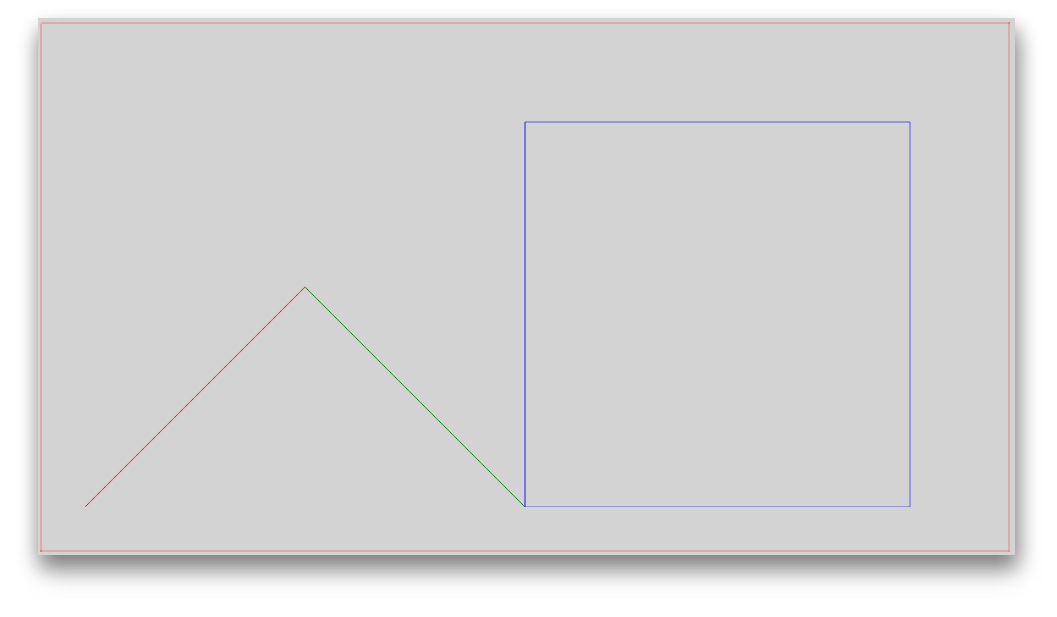
Draw lines from Front Face Vertices to Origin
What we’re doing here is just figuring out new points for the square, using delta as the length of one side of the square. We can add these few lines to connect two of the vertices to the origin point:
ctx.lineTo(x0b, y0b - delta); // back up y-100
ctx.lineTo(x0, y0);
ctx.lineTo(x0b + delta, y0b - delta);
ctx.strokeStyle = 'blue';
ctx.stroke();
Before we finish up here, take all the ctx._____ things you wrote and wrap it inside of a function. This is necessary because we are going to call the function everytime we modify an input value. The logic should look like so:
function init(){
  // ctx.____ logic we just wrote
}

init();
Add Event Listener Slider
We want to have a canvas element that dynamically rerenders on input. Add a slideContainer with the input inside of it next to canvas element.
<div class="slideContainer">
  <input type="range" min="1" max="800" value="50" class="slider" id="myRange">
</div>
We’ll also have an event listener targeting the slider we created. It will do the following: clear any previous drawn lines, update a global variable delta, and redraw the entire canvas.
Remember function init()? This is where we call it once we use our slider
slider.oninput = function () {
  ctx.clearRect(0, 0, canvas.width, canvas.height);
  delta = +this.value;
  requestAnimationFrame(init());
}
Check the following code to see the entire script.js file up to this point. See the codepen demo to see everything we did thus far.
Summary
In the next part I will cover how to refactor this, and create the original gif from the start. We’ll add additional slider controls